
.png)
What is a Modular Campervan? Most common Cardiff Campervan foundation build features explained
- Korey
- Jan 1
- 8 min read
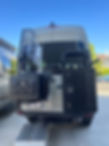
For most of our builds we like to start with a Sprinter 144" "crew" trim van or passenger van. We like this van especially for families as it already is functional out of the box and can reduce building costs as it already has a floor, walls, headliner, windows, seating, and even a rear heat duct for passengers in back. More importantly its usable out of the gate as they say. You can just put some cots or mattress in the back and go camping. We like the 144" wheel base, it fits in a regular parking spot and a great daily driver size. These vans new (2024) range from $70-$90k depending on options chosen.
144" Sprinter Crew Trim Van

Video Overview of features discussed in this article
Phase 1 - Minimalist Build, things you can do without taking the van apart, also a good Phase 1
Even though you can use this van out of the box just a few add modifications greatly increase the functionality of the van and don't require you to blow the van totally apart.
Bed and storage locker space-you need a place to sleep
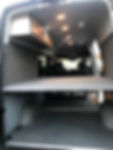
Adding a modular removable bed allows you to sleep and not move you gear around. All of our beds are modular, they remove easily and are made of 3 panels so you can remove panels as needed. Our preferred bed is the MOAB Bed made by Adventure Wagon due to its adjustiblity in height and ease of removing panels. Its however expensive. If you don't need adjustability, we make fixed height beds for much less even ones with storage cubbies. We like to keep the full width of the van under the bed so you can still slide a 48" piece of ply and larger objects. You purchased a large van, lets make sure you can still use it as a van when needed. Also 3 panels allow you to remove one panel and get two rows of bench seats in the van and still have a bed behind those seats. Your gear can fit below or it provides another sleeping area. These beds range from $3-6k installed.
MOAB Bed with V1 Wall kit allowing height to be adjusted up to top of head liner

Panel sections allow you to stack them or remove them as needed

Bed with storage cubbies

Simple 3 panel bed, still with removable panels
Why you need gear storage...if you have passengers your gear needs to go someplace

Rear Dinettes
This is a common feature people ask for, and very popular in social media. These work great however functionally there are really significant things to consider in your build...storage. There is typically storage under the seats, however it is limiting as well as to get a full size bed across the entire van for those taller than 5' 6" the bed must go into you slider door opening space on a 144" WB (Sprinter) or 148" WB (Ford) compromising functionality. More importantly where is all of your stuff going to go when you want to sit down or go to sleep? Its a great design if camping is not your main focus or you don't have a lot of gear. This option is around $5-6k.
There is a great option however to over come the drawbacks of a rear dinette. Read further how we do this.


Ventilation-windows needed
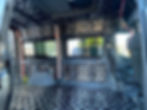
Its usually warm when you camp, you have to get that hot air out of your van and exchange it with cool air. You start with ventilated/screened windows. Most budget builds skip this step as windows are not cheap, but super important if you want to keep temperatures down. Windows range from $900-1400 installed

Larger budget add rear windows, we like full sized ones and you get a view to boot. Great for visibility when driving and you can use insulated magnetic window covers for privacy when needed.

Full OEM look vented/screened windows

Rear "pill window" with screen

You have to finish out the interior of a pill window with a panel and trim to the wall, example of a simple panel and trim. This can be some what involved depending on material used and finish

Place to eat or hang out; dinnette without moving every thing.
We like the idea of rear dinettes, they just are not very functional if you have lots of gear so we make one up front by adding swivels to the front seats and a table. This can be set up in minutes. Add a longer seat rail and you gain more flexibility. You can as well put table mounts off the B pillars in the van as well to run table(s) only for the front seats. ~$2k


Add a double seat track and you can move the bench seat back as well


Upper Rear Panels
You don't have rear panels in the back where the rear side windows go. So you must cover this area. This will make the van quieter as well keep you from denting up your van. You can run a panel, a full size window, or a panel with a pill window. $600-1600 depending on panel finish and if window trim is needed for like a pill style window.
Simple Panel

Full size window

Pill Windows and panel

Functional Upgrades-Phase 2 build
These next items really greatly improve and transform the van in comfort and functionality but require the van to be taken apart (if you have a crew van) When this happens generally you should consider everything in your build. This is a big step, its like taking down your drywall in your kitchen. Kinda have to go for it. You could do these in "steps" but you will often be paying twice if not 3 times for the labor taking thing down then putting them back multiple times. It can get expensive. However as we say its what you don't see that counts in a real van build. The stuff before this step above for sure is the super easy stuff.
Insulation and sound deading
Yep its a huge difference. We sound deaden and insulate. We have an entire article on tis in our blog. Lots of builders skimp in this area with either material quality or quantity. This is what will make your van cooler in summer, warmer in winter, and make your van as quite as a Honda Pilot.
We use a bunch of sound deading material, top of the line Dynamat. No asphalt in this product unlike the most common ones. You can smell it in the product. (cheap stuff)
of course we do the doors...including front ones. Again many skip this step.

We insulate with 3M Insulate Automotive specific insulation, it has superior sound dampening qualities over Wool and is specific for automotive use

We get the insulation in nooks and crannies as well as sound deading the rear wheel wells.

AUX Power
You need this to run fans, charge phones/laoptops/tablets, heater, fridge, fan, and lights so you don't drain your starter battery. The difference is a "van" system vs a power station is a van station is truly integrated in your van with alternator, solar, and depending on system shore power. Costs vary depending on the system and needs. Most of our builds just require a system that can be put under the hood keeping space free in the van.
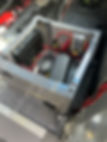
Example of AGM system under hood. You cannot put Lithium under hood due to heat. This however is more than enough power to run basics in the van as mentioned above. The blue boxes are batteries we squeeze under your hood saving interior space.

We tuck the panel under the front seat to keep the inside of your van clear. This photo shows not only the panel, but a amplifier and even a heater.
Lithium Power system inside the van. This is easily 2-5 times more money however you gain a lot more power, AC, and even shore power charging.

Solar
You might not need solar if you are not running a fridge, but you should at minimum run wiring for it to install after if your have your van apart. Its a huge mistake not to at least pre-wire for it. Most think you need to only use solar for your battery bank, you actually need both alternator and solar ideally and on larger systems shore power is a great idea. Your van does not "run" off of solar, solar is actually a gas pump up your gas tank that is your batteries, same as the alternator. It is actually not the gas tank itself, a common misconception with new van owners. We often have people come back and add this on as everyone tends to use way more power than they think and its super limited in a van unlike your home connected to a power grid.

LED Lighting
You have our factory lights, which we always keep functioning as they are from factory but you need lighting that does not drain your starter battery so adding interior lights connected to your aux battery is a must.

This is also the time to ad outside lights or audio upgrades to rear as your van is apart. (dry wall is off as they say)


Fan to move air
This is a must have to move hot air out and cool air in. With your vented windows this works very well, but you can't get any cooler than the shade outside, but with insulation and windows you can get the temperatures down that low. This is impossible without insulation and windows.
Storage Cabinets that are removable
Just like your home you can never have enough storage and in a van its even more of a problem, especially when you have a family or bikes in back. We use semi rigid removable cabinets. They won't break your head open when you hit them, they have 2 x the storage capacity as a hard cabinet at least. You do however need support structure to put the L track for mounting. This must be done when you headliner is out. You cannot just "bolt" these to the roof of your van. Its a game changer to keep your gear organized and it makes room for more sleeping areas or gear
L Track to support cabinets as well as you see a fan and LED lighting in this photo

Another example of storage and the concept of being able to remove everything from van easily. This also shows a very large power system in back tucked to side to leave room for gear.

Even more storage can be done under bed, removable semi rigid storage bags, this is also example of a simple 3 panel bed.

DC Outets
We put DC (usb/usbc and cigarette lighter) outlets for phones, laptops, tablets, fridges, and bike pumps through out the van. You see the rear heat duct in this crew van not available in a cargo van. This also has swivel seats we added in this photo.

Significant add on's to a foundation build
Heater, outside shower, suspension improvements, side steps, roof racks, floor coverings, insulation, sinks...all can be done as other steps in a build. This is however how you can easily go from a $25-30k build to a 50k build very quickly. Most of these add ons after a foundation build are easily done as the basics are already in place. Similar to a track home...when you move in the foundation/infrastructure is in place...now you can customize to specific cosmetic or functional needs.
Examples-just a few
Awning ~$2k

Wheels Tires-needs fender mod for larger tires ~$3-5k

Outside Shower ~$2-3k

Front Shelf

Water tank and extended capacity gas tank ~$2-3k each

ladder, tire carriers, boxes ~$3-8k
Suspension Upgrades ~$8k+

