
.png)
2020 Transit Crew AWD Crew Build
- Korey

- Aug 16, 2020
- 17 min read
Updated: May 9, 2021
We don't build a lot of Transits but thought we finally will tackle a "simple" Transit build our way keeping it very simple. We started with a Crew- because it has rear seating, rear air bags, and its pretty economical compared to a Sprinter. Having said that Transits are way harder to build with a lot less product support and the Crew van interior is really strange...you get "half" of an interior. We have some photos below next to a 4WD Sprinter with wheels and a stock high roof Transit. You can see how funky the interior is. The van is also kinda ugly, we will knock the ugly out on this build with a lift kit, roof rack, rims/tires, and maybe a few other things that will really help in the looks department as well as get more ground clearance. The Transits have really bad ground clearance and departure angles.


Priority is getting a rear floor in the van so we can protect the rear and level everything out. We decided to keep the stock front floor...its composite/ plastic so durable and easy to clean. We want to keep this budget in check and will work with it as well as there are plastic trim pieces that if we changed the height of the flooring would make a lot more work. The idea here is to keep things simple and focus on function and practicality in this build. We start with making a sub floor, with out a template, something that takes a bit of time. Since the front floor is raised so high we will have to as well level it out to the front...so basically making two floors then deciding what we will cover it with next and trim it out. Its simple but floors are really time consuming to do. Its too bad Ford did not have a full floor option on a crew. This for sure can be an all day job just making a template...or actually several as we have two layers of wood and due to funky angles on the wheel wells you the layers are both different.

There are many things that make the Transit a more difficult van to modify/upfit other than lack of aftermarket support, convex walls, hardened steel, ... is if you dealing with a passenger van or crew van you deal with a huge headliner taking up a ton of space and air bags. Here is photo behind the front headliner in a Crew trim van. The airbags make the van safer, but as you can see are a problem in regards to installing L track or any upper storage as not only is the gap a problem but he air bag interference is as well, but you do get a "A" for safety for the kids in the back unlike in a Sprinter. This also makes the van not as appealing as a Sprinter for sure for up-fit. We will be pulling this down to put sound deadening and insulation to get the van cooler. This is a must in California if you want your van to be as cool as possible and warmer in winter. Not to mention a lot quieter as well.

So a bit more progress...to many customer vans and back ordered parts have made it difficult to get things going on this build. Finally pulled the headliner down (the 1/2 headliner that is). I use Raam Mat sound deadener, I find this is a superior product to what most use for their builds then lay down 3M Thinsulate over that. This really provides a really nice result. You can see a lot of care is given to make sure coverage is very good. Try to get all the major nook and crannies. It takes a long time to do this to a van. In the end all the walls, roof, and doors will be done. Surprisingly this van is actually pretty quiet stock, but its really hot. It was a hot day and the roof inside had to be at least 130-160 degrees, once this is done, you can barely feel the heat at all at the headliner. Its a huge difference well worth the effort and costs. Its expensive to do and can take easily 3-5 full days for an average person to do, but we consider this a must have. It is likely we will put some insulation as well on the floor just to help out as well with noise and some heat from the exhaust, but not anything super extensive like on some of our builds to keep costs down. You can easily spend $1000 in material alone just to insulate and sound deaden your floor. The back roof is not done yet as I have to figure out how to mount the upper storage bags in the back. Not sure if we will use Campo or MOAB, its a bit tricky to use the MOAB but will have to see. Electrical as well will be ran while I am doing this. We are going with more of a "DIY" solution for this van with a Goal Zero 3000x. It will be charge by solar as well as option to charge with alternator as well. More than enough power to run a fridge, lights, and power phones or lap tops, and a few 12v DC outlets. It has a built in inverter and is big enough to run a microwave or hot plate as well as long as you be mindful of the size of the battery bank.


Some suspension parts as well showed up from Van Compass. The Transit is painfully low to the ground, so much so its a problem just getting up in some driveways. Going to put a 2" lift on it. Why not a 2.5" lift? This actually causes at full droop issues with the front axle's and potential premature wear. Their are no aftermarket wheels available for the super weird 99mm off set Transit put on the AWD's. (Stupid) So we will just black out the OEM stock steel wheels and put a set of 255's on them. This is the largest size before you have to do some major trimming. We want this van to be super practical rather than cool, but not functional.

The van continues to be super strange, the front floor is made out of super thin wood layer with foam blocks to rest on. Changing it however doesn't give a big upside as we don't plan on boltign anything down/through it otherwise you would have to build an entirely new floor. -not ideal because this thing is raised really high and you have to deal with the floor brackets. As it is its much cleaner looking with the stock floor as is. This pick shows what it looks like with the front floor out when taking measurements for the front floor covering we will do in the next week or so.

Here we pulled the rubber mat off the front floor, we plan on putting interwoven vinyl on top of it instead to give a much nicer looks as well as it will add a bit of insulation and padding. This stuff is used in Pontoon boats, so its perfect for So Cal or out door use and will really improve the look of the interior. Its not cheap however and ideally you need to pull the floor to get a good template to cut it from.

Lift kit installed, tires are still back ordered but you can tell this gained 2 " in front and about 2.5/3 in back. Kept the front limited to 2" as I mentioned to keep the cv joints within spec and reduce any excessive wear. The Fox rear shocks in the back made the rear stiffer as expected but when weight it added it should be a nice tight ride. This is a very much needed modification on the AWD's they are very low to the ground and have no clearance compared to the Sprinter. Great to make it easy to get in/out of, but would not be ideal on dirt roads. This brings it similar to what you would get in a stock Sprinter 4WD. I will also have to modify the rear shock bracket, that is off the ground about 6 inches...you have to cut it and use a bracket to gain a few more inches there.

Shock mount modification. After lifting the van you still have the rear show super low, below the rim even. Here we show stock and after stock modification using a relocation bracket. A bit of cutting is needed to relocate the shock. Its seems small, but its a huge difference needed as well optimizes the Fox Shocks articulation.
Stock

Modified-WAY better.


Back ordered forever, finally swapped the factory windows for some AMA windows. You have to remove a lot of the plastic trim to enable a window installer to remove the factory window without damaging the van. It is really easy to damage paint when removing factory windows, these in particular are a very tight fit. Not a simple swap like on a cargo van. Why the front windows? You need to move air through the van to cool it down, so when fan is in back, you must vent from front of van, in this case the OEM front window positions with vents and screens provide the appropriate air flow to keep the van cooler during hot weather. You cannot use CRL windows to swap out factory ones as the opening is to large.


Finally got around to deal with the floor, this is a really big project time wise. Started with making the rear section and building it up level to the front floor, add sound deadener and insulation on the floor,(the Transit is actually really quiet for a stock van) but the front stock floor was so thin that I decided to do this front and back since I had the floor out. This van will be really quiet for sure, way beyond stock. Insulating and sound deadening the floor is really nice, but you use a lot of material and its pretty expensive to do because of the square footage. Its not 100% needed for most people but decided to go the extra mile in this build. I as well ran power cord through the wall for the Goal Zero 3000x (not the easiest thing to do to keep it clean and hidden) and insulated and sound deadend the slider door as well. The slider has some insulation on the panel, adding what I did will make it 300% better. I still have to do trim pieces for the floor mid-line and in the rear door area to complete the floor. I have custom seats ordered as well to replace the stock seat that was to wide to be functional for a campervan.
The final flooring material used is interwoven vinyl, this is a really nice floor material. Its not cheap, but works well with moisture and beach environments. Its used in boats, so perfect for a van. Gives a real upscale look as well, helps with reducing noise, and adds some insulation factor as well. There are several types that can be used, all of which I use have flocked backing that allows the floor to move around with hot/cold and is a must. A regular vinyl floor will not have flocked backing and not work the same and not have nylon weave for strength in the material. This stuff however is pretty expensive for a flooring material.


Flooring is almost done...looks a lot better than stock. If you have a stock van you can add just coin flooring in the back to match the front to keep costs and labor down and still have a nice result.
So a bit more work...BFG KO2 255/16's. We will black out the rims to give a better look. With a 99mm offset no wheels are available yet for the AWD's. This really took care of the ground clearance issue, not its on par with a Sprinter

Some updated interior pics with floor trim and one wall panel done.


Photo update...lift kit, tires, and black out wheels make all the difference.

A bit more progress on this build by dealing with the seat swivels. We used Sportscraft swivels for several reasons; low profile, minimal play, and feedback from others this is the best one on the market available in USA with crash testing approval. There are cheaper and easier to install swivels available. (that are no so good from feeback or not safety tested) So far the "easy" passenger swivel was tackled, this swivel requires modification to fit including taking the wiring harness apart so you can fit the electrical cables up to through the seat swivel, modification of mounting holes as they don't line up well in the newer vans, and shorter bolts. It is one of the more difficult swivels to install out of all the vans from my experience by a long shot, not what I would call "bolt in". Took a bit of time and this is the easy seat of the two. The drivers seat is in progress and requires significant and time consuming modifications. Just dropping the hand brake to get it to work is a very involved time consuming job...requiring cutting bolts, drilling, filing, and other modifications. Lets just say this is one of those projects that "bolt in" is really an understatement with these swivels as most things in a Transit van.

We got the hand brake now dropped down...after 8+ hours and an insane amount of cutting and tools to get it to look stock. This is something that is really time consuming. With little to no instruction and just a few threads from others on the internet got it done. The Sportcraft ( great seat almost no play, but not easy to put in) seat however does not fit ideally on the drivers side so I ordered another swivel. (A LOT more expensive). Hopefully we can get that one to work. The batteries under the seat are really the main problem. Not motivated to do this modification any time soon again. Below you see the final brake handle in lowered position. 255/70/16 BFG KO2 (Even these tires are on back order for months...we got lucky chasing them down for this van)

Still waiting for parts, this year, and in particular Ford Transit Van parts are really difficult to get with 3-4 month lead times for simple parts...windows, beds, electrical components. This van should have been done weeks ago...looks like it will be December when this will be done. If you are planning your own build get ready for a lot of frustrating delays, and it isn't getting any better for any parts for any vans. This has been the case with every build we have done this year since COVID. If you are wondering how much of a difference in ground clearance check out the below pic in tire size...+ we added 2" of lift...its a HUGE difference. These vans are WAY to low stock or any time of driving on uneven terrain. Stock tire is on left. This is our our spare tire, as you can assume it doesn't fit under the van, we will be putting on a rear tire carrier to hold this tire. With AWD we want to make sure this van is set up right with a full size spare.

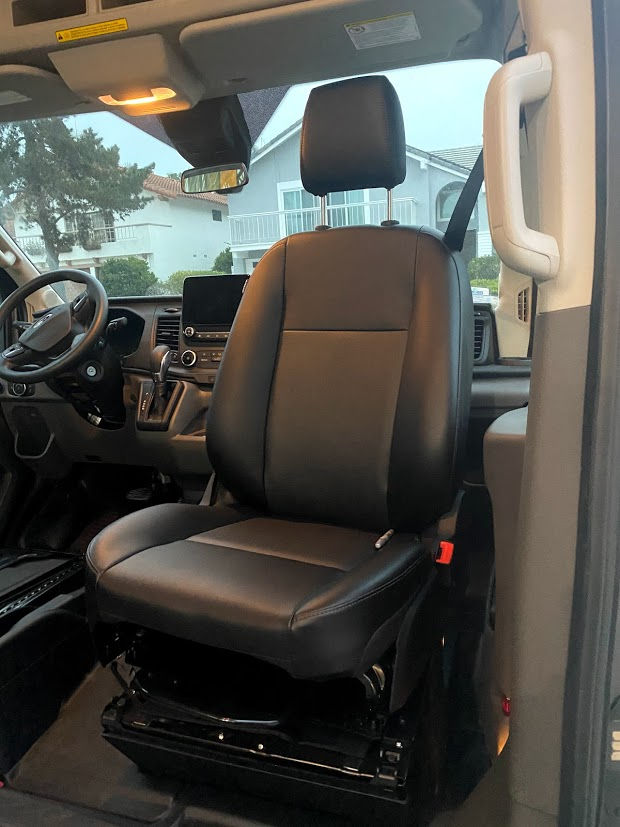
Added a two seater into this van that is removable and reclines. The stock seat is WAY to wide and you can't get from front to back. A three seater will be available as well in the future but is not available at the moment so we put the two seater in.


Adventure Wagon lagging big time on their Transit bed and I had a Flatline bed I decided to put in. Its height adjustable (5 fixed positions, 4 " increments. The panels as well are removable. This was a beta pre-production bed so some modification was needed to get it to fit correctly. Their production model will incorporate needed changes to make install a bit easier based on feedback. Here you see the wall brace that was modified to fit the crew van. It was a bit of work for sure to get it to fit and not interfere with the crew trim or airbag. We have a bit more work and hopefully we can get this a bit farther along in the next few days. Its solid. The braces are "easy" kinda...to put in, lots of rivets as well as I put a few rivnut inserts as well to make sure these braces are solid and never going anywhere. It took a solid day to get these modified and installed...now the panels can be fitted...a bit complex if I want them to be able to adjust and I have some ideas how to put them in and allow for adjustment if needed for the bed height.

Photos of panels "mocked" up. This was the easy part...some notching needs to be done to get them to fit, but having them work the the braces is going to be a bit tricky.

We got the panels pre-fitted. A bit more electrical has to be done before they all go on for the final time. Here we have a photo of trial fitting one side after they have been upholstered. All those holes are to allow access to the welded nuts so bed can be adjusted in height by removing bolts and and changing bed channel height. A spacer as well has to be used to get the bed to fit properly. Its a pretty good amount of work, typical for a Transit, they are way more time consuming to build compared to say a Sprinter...which would have been 1/3 of the work. The top panels will be tricky as my goal is to also set this van up for Mule bags.

A bit farther along on the panels; mapped out a few more outlets as well as solar controller location and mocking up the Goal Zero power source we will use for the aux power. Goal Zero's power module along with other parts further delayed...now over 3 months...


Moving farther along with upper panels. These are a bit tricky as you have to work around wiring that can't be moved in a crew very much which made what seemingly is a easy panel to build no so easy. Pre-fit is done before final adjustment. Then finish electrical, lights, insulation, and upholster them for final install. Reinforcement behind them for L track is also done as well to be able to hold Mule bags.


Flatline Van height adjustable bed is now installed. It is adjustable by removing panels and changing height with 4 bolts. Not a "quick" change, take about 5-10 minutes. A bit of work for sure with the mount and panels to get it all to fit right - like most builds but coming out nicely. Everything is set up for Adventure Wagon Mule bags...just waiting for some L track to show up and those will be in as well.


Finally got the driver swivel done. Needed to go to the Scopema swivel to clear the dual batteries. The Sportscraft has less play, but on Scopema fits better on drivers side. It is as well much easier to install as it has a large middle opening to run the harness through. The drivers side swivel is bolt on, but it was a huge amount of work to finally get it to fit. Needed to use a 1/2 inch spacer, LOTS of cutting, all to get it to look factory and work smoothly. This is a big plus to have but certainly not something that is easy nor fast to put in, especially with dual batteries if you want everything to look clean. You notice the brake handle looks stock, its not all chopped up and the housing is clean fitting. This wasn't easy to get right to look factory clean.


Lowered brake handle

A bit more progress. L track is mocked up for Adventure Wagon Mule Bags for upper storage. This L track is not "bolt" on, that is you must build a foundation so that it can be mounted properly as well as aligned right so the bags fit. This was taken care of before the panels where built...but this is a big step forward to getting this van completed. Some big eye candy will go on the van next week and will be that much closer to completing the van.

Double checking the Mule bag fit with the L track spacing. These are semi-rigid bags with lots of pockets, removable. They are great above the bed especially as if you hit your head on the you don't cut your head open. They are all about functionality. Was originally going to do Campo bags I ended up going with these to maximize storage space since up front the airbags and headliner do not allow to have upper storage. Campo bags are a great alternative as they can be a duffle bag as well and remove instantly, but the L track has to be mounted on the wall, not wall/headliner. They still can be used in this van...just hang a bit lower.

Finally some eye candy. Rear ladder/tire carrier, roof rack, and nerf step bars from Aluminess. These are super nice...what is frustrating is the 5 month back order to wait for them...can be yours asap...this van for sale soon...


Front drivers seat spacer was way to high for anyone under 5 9"...so I worked on making a new one to angle the seat and lower the front of the seat so that if you shorter your feet can reach the pedals and you can drive the van comfortably. This is generally not a problem with a single battery, but the dual batteries clearance is a huge problem that greatly complicates installation so much so that in general swivel seats are not recommended. Problem solved here however. :) Custom spacer. I can honestly say I wont be doing in front drivers side swivels in a Transit van anytime soon. Lowering that brake handle properly and cleanly is a bunch of work. In this van that I built like I was to own it however this was a must so I can have a front seating area with a table with a family.

Mounted the Lagun table mount. With swivel fronts seats you must have one of these. There is not bolt on solution, in this van we did a custom one to work with these seats. We do sell bolt on ones for factory Sprinter OEM seats however. This system works really well and very handy providing a place to eat/drink/hang out with your gear in back.


The bracket mounting was similar to this for Lagun Table

Finally getting to the tail end of this build, the Goal Zero 3000x and fuse panels installed. This will be secured to the floor. We use a fuse panels so that all of the low voltage connections are properly ran, as well as the solar will be hooked up and the car kit once available can be plugged in. The extension cord type thing you see is for the car kit...just a simple plug and play, we have this all properly wired to the alternator through the starting battery properly fused out as well.


Door insulation. We only use superior products in our builds and do a complete job. In our doors we often use more sound deadening than others do in their entire van walls. Dynamat Extreme and 3M Thinsulate in front and rear doors. We also are doing a speaker upgrade as well in the front doors. Yes it makes a big difference if done right. It surprises me how many don't do their doors...but they do their walls. How we do this is why our vans tend to be a lot quieter than most, however we tend to use 50%+ more material than most as well. Try pricing out 160 square feet or more of Dynamat extreme.. We stay away from the cheap stuff that often has asphalt in it, that should be used on your roof.


Decided to insulate the upper part of the rear doors...problem is no way to access this unless you put a hole into the upper rear door for access and then this allows you to sound deaden it and insulate this area. Still trying to keep this build "simple". But with a Transit van nothing seems to be super simple compared to other van builds, just another example of this here. :)


Rear Mule bags and L track is now completed.


One of the two solar panels are mounted on the roof. These panels where silver, painted them to make them hide a bit more from the ground. Waiting for a few more brackets then the other panel will go on. Using the long narrow panels so there will actually be some roof rack left to use (front half). These panels are a lot more expensive, but needed when roof space is at a premium.

Added 2nd panel. 180W total power. These panels help maximize open space on the roof rack. Most done' realize when you have a fan(s), solar panels, and even AC on your roof your expensive roof rack is really up there just for looks. In this van at least there is about 1/2 of the rack open for actual storage for gear.

Van is sold. Cost to duplicate this build would be around 103k. We sold the van for 95k. (very fair price). I have to say Transits are more difficult to build compared to say a Sprinter for sure. They are nice vans but need significantly more modifications to be similar to a Sprinter so in the end it's about a wash if you are just going on $ spent. Its a nice van and if you want a Ford I would buy one if that is what you wanted but be prepared for a few more challenges in getting it dialed in. We did this van as "simple" as possible. There are certainly ways you can build this better for sure for more $ and time. Our goal was to build a family van that was flexible in design and modular in nature with maximum safety features that the Crew van has. You would not be able to do this with a passenger van however.
Build Photo Album link:


This is a great writeup! Thanks for all of the information and pictures.
Is it possible to provide more details on how you reinforced the L-Track? I am considering a Flatline bed + bunk and would like to support a hanging bunk from ceiling/upper L-Track.
This is super helpful thank you! Is this crew van the long length or extended?
How did you all do the window cutout in the existing side windows?
Looking good. Like the blacked out wheels. Nice back seats! Where are they from?